For many people, the upcoming holiday season will be the most ambitious cooking and baking season of the year. And the New York Times food and culinary team wants to help. Last week, it was special thanksgiving sectionfull of recipes and delicious-looking photos.
Apple pie with beautiful lattice-like dough. Perfectly plump turkey. The macaroni and cheese is baked to a melting consistency and oozes out nicely.
Writers and editors create recipes, and photographers take images of the finished dishes. The food stylist, the go-between, is responsible for preparing and arranging the food for the photo shoot. And it’s not just about making the food look delicious on camera.
A food stylist’s work begins when they are given a recipe. Armed with inside information on where to source the best ingredients, your stylist will begin by scouting out all the items on your shopping list. Food stylists make friends with bakers, butchers, farmers and fishmongers. I am familiar with every aisle in Whole Foods. I know a specialty store that sells out-of-season or hard-to-find items.
The food stylist then performs all the necessary prep work and follows the recipe to a T (often multiple times). Once the food is completed, the stylist will plate it for a photo shoot. Small tricks are sometimes used to make food taste better, but the dishes featured in the Times are presented with minimal manipulation. The cuisine should be ambitious yet approachable.If you see food Too Even if it’s perfect, the reader may be intimidated and not try to make it happen.
Food stylist Simon Andrews says: Anyone can look at a photo of a dish and think, “Yes, I should try that.”
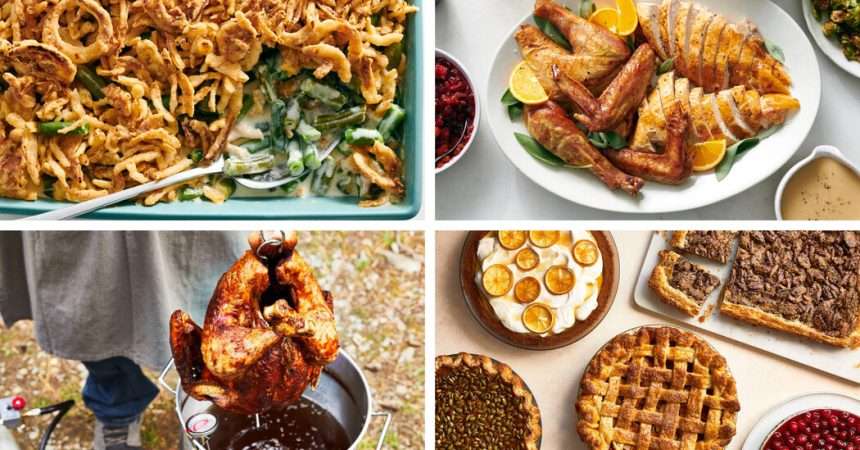
Below are four photos accompanying recent Thanksgiving recipes, annotated with background information from food stylists, including Mr. Andrews.
“Every dish has its moments of deliciousness,” Andrews said, noting that it’s his job to identify those moments and “enjoy them.” For Eric Kim’s green bean casserole, Mr. Andrews decided to reveal a baked dish with the chunks hollowed out, revealing bright green beans alongside a creamy white coating. In Kim’s recipe, he suggested using heavy cream instead of canned soup. So Andrews wanted his photos to emphasize the saucy, flavorful finish of the dishes. “A little bit of clutter or a few drips can go a long way in making something feel more familiar and less valuable,” Andrews said. In other words, don’t cause confusion.
To execute Kim Severson’s deep-fried turkey recipe, food stylist Sid Raftus McDowell first needed to find a 12- to 14-pound turkey. But most frozen turkey meat has thermometers embedded in it, so he couldn’t buy it over the counter. “When you pull it out, it leaves a hole, so the turkey has to look perfect,” says McDowell. After several phone calls, she tracked down turkeys at a farm in New York’s Hudson Valley and purchased three turkeys in case she needed backups. (She said she got it right on her first try.) Since frying couldn’t be done in a studio, Ms. McDowell set up the equipment in her front yard and carried out the task with her husband. I asked photographer Armando Rafael to help me. , especially useful when removing the turkey from the oil bath for temperature checks.
According to Laurie Ellen Pellicano, who prepared more than a dozen pies. The Times’ roundup of the best Thanksgiving pies, The secret to a perfect-looking pie is in your pantry. It’s aluminum foil. It’s the “unsung hero of flaky puff pastry,” she said. Once the dessert is in the oven, bakers have limited control over how the steam and temperature affect the pie’s appearance. So for the shoot, Pellicano created aluminum foil sleeves or other coverings that he placed over the pies during the last 15 to 20 minutes of the baking process to encourage or prevent certain areas from browning. It was. (She admits that aluminum foil isn’t foolproof, so she baked at least one spare pie of hers per recipe for the photo shoot.)
Claire Saffitz’s Easy Thanksgiving Turkey aims to demystify the roasting process. Following the recipe’s instructions, Andrews seasoned the bird and refrigerated it overnight, giving the finished product a crispy skin that looks great in photos. His other trick for getting shots where the meat looked moist was to carve and plate the turkey much faster than you would do at home. The recipe recommends resting the turkey before slicing, but for the photo shoot, Andrews cut the turkey just minutes after it came out of the oven, before the heat and juices had fully subsided. . “I’d like to say it has more magic and fireworks involved,” he said. “But it’s more about knowing when something is done and how the camera is capturing things.”