
The idea for these cookies came from scrolling videos of people making designs with clay. My curiosity led me to wonder if I could do the same thing with cookie dough. Can I dye the fabric, add more fabric, stretch it and have it completed? Because if it works, it will save you a lot of time and hand cramps. I gave it a try and was thrilled to find another shortcut to making beautiful sugar cookies with a slightly indulgent feel.
I love this dough because it mixes quickly and requires very little chilling time. Dough is ideal for this technique because it can accommodate the addition of small amounts of gel food coloring. The cookies themselves aren’t too sweet, so I like to make them into sandwich cookies and sandwich them with my favorite buttercream.
Save and print the recipe. pattern sugar cookies
If you decide to make these cookies, I have two pieces of advice. First, get creative by making the shapes in your design smaller than you think. The ideas for these cookies are endless. The design is only within your imagination. You can get creative by just cutting out shapes. For example, you may only need part of a cookie cutter. The cookie-shaped rabbit ears become petals.
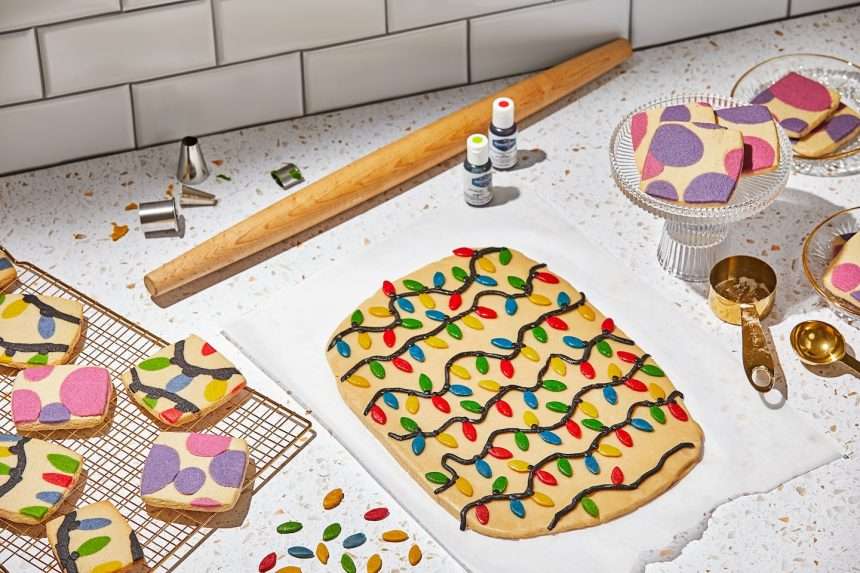
Here we’ll show you how to create a holiday light scene, which is definitely the “special” way. If you want something more simple, we’ll also show you how to make simple geometric patterns using polka dots and other basic shapes.
Get ahead: Decorated slabs can be covered and refrigerated up to 1 day in advance. Unbaked cut cookies can be frozen for up to 1 month, with an additional 1 to 3 minutes of baking time if needed.
storage: Store in an airtight container at room temperature for up to 1 week or frozen for up to 1 month.
Where to buy: Hexagonal cookie cutters, fondant cutters, and clay cutters can be purchased online or at baking supply stores. To design the holiday lights, I used small petal-shaped fondant cutters and AmeriColor Soft Gel Paste Food Coloring.
Replacement: Gluten free? >> Add gluten-free all-purpose flour blend and 1/4 teaspoon xanthan gum. Vegan? >> Use dairy-free butter but refrigerate the dough for at least an hour. If it becomes too soft while working, chill it in the refrigerator for about 10 minutes to firm it up.
Note: If you want to make sandwich cookies, fill the cooled cookies with your favorite buttercream. (Re-rolled scraps are also perfect as the bottom of sandwich cookies.)
- 3/4 cup (150 grams) granulated sugar
- 1 tablespoon finely grated orange or lemon zest (optional)
- 16 tablespoons softened unsalted butter (2 sticks/227 grams)
- 1/2 cup (110 grams) light brown sugar
- 1 large egg
- 2 1/2 teaspoons vanilla extract
- 1 teaspoon almond extract
- 2 teaspoons baking powder
- 3/4 teaspoon fine salt
- 3 1/2 cups (440 grams) all-purpose flour, more as needed
- 1 teaspoon milk (any type) or water, if desired
- 2-6 food colorings of your choice, preferably in gel form (see where to buy)
Make the base dough. Place a rack in the center of the oven and preheat to 350 degrees.
In the bowl of a stand mixer fitted with the paddle attachment, or in a large bowl if using a hand mixer, combine the granulated sugar and zest, if using, and mix on low speed until the sugar is moistened and the zest is evenly distributed. . Add the butter and brown sugar and mix over medium heat until light and fluffy, about 3 minutes. Scrape down the sides and bottom of the bowl. Add eggs, vanilla extract, and almond extract and continue to mix over medium heat until combined, about 30 seconds. Scrape down the sides and bottom of the bowl. Add baking powder and salt and continue stirring over medium heat until well combined, about 1 minute.
Stop the mixer and add the flour. Start the mixer on low speed and slowly increase it to medium speed as the flour begins to mix. Mix until there are no streaks of flour, about 1 minute. If the dough looks dry, add more water or milk. The dough should stick together when you squeeze it between your fingertips.
Remove about a fifth (200 grams) of the dough. Transfer to a bowl and cover.
Place the remaining dough (about 800 grams) on a 12-by-16-inch parchment paper, cover with another parchment paper of the same size, and roll the dough into a 1/2-inch thick rectangle. Approximately 9 x 12 inches. This will be your “canvas”. Set the dough canvas aside, leaving the top sheet of parchment in place.
Divide the dough and add color. Next, dye the remaining 200 grams of fabric in the desired color for your design. If you use liquid rather than gel or food coloring, it’s a good idea to have a little flour on hand to sprinkle on the dough if it gets too sticky.
To create your holiday light design: Divide the dough into five 40-gram portions or four 50-gram portions, one for each color. For example, you can make the lights yellow, red, green, and blue, and dye parts of the cord black. Or use yellow, red, and blue for the lights and green for the cord.
To create a simple geometric design: For a two-color design, divide the fabric into 100-gram portions. For 3 colors, 66 grams. 4 colors, 50 grams etc.
It is important not to overmix the fabric when dyeing, so avoid kneading. Instead, take one serving, make a small well in the center, and add a drop or two of food coloring. Fold the fabric to enclose the dye. Cut the dough in half, stack the two pieces together and squeeze. Repeat this process until the dye is evenly incorporated. Change the direction of the fabric after every few tears to ensure that the dye is distributed throughout the fabric. Repeat with the remaining dough sections.
Cut out the shape: Once the fabric is dyed, cut out the shapes needed for your design. Lightly flour the counter and rolling pin. Roll out the colored dough section to about 1/8 inch thick. It’s easiest to cut out all the shapes you want to use before placing them on the “canvas.” Use a die-cut cutter to cut out the design elements, and if necessary, dip the cutter in flour or sprinkle flour on the counter or rolling pin to prevent sticking. If needed, reroll the colored fabric scraps and cut more shapes.
For holiday light designs: For colored light bulbs, use oval or petal-shaped cookie cutters. Using a knife or pizza cutter, cut long strips for the cord from the black or green fabric. Leave some of the fabric behind to “attach” the light to the cord later.
For simple geometric patterns: Select a shape. You can use the same cutter for multiple colors or combine different shapes and sizes between colors. Choose a polka-dot design that combines circles of different sizes from a biscuit cutter set or other kitchen supplies (the wide end of a pastry tip is perfect for smaller circles). Star cutters in multiple sizes are a great option. The same goes for snowflakes.
As you work, transfer the shaped dough to a large plate or cookie sheet to see what you need to work with.
Assemble the canvas. Once all the shapes are ready, start building your masterpiece. Uncover the plain dough rectangle (the “canvas” seen from above) but leave it on the parchment paper at the bottom.
Move the cutout shape until you are happy with the design. Rolling it up will expand the shape and the gaps, so don’t be afraid to fill in the gaps. Offset spatulas are great for positioning and moving them.
For holiday light designs: Place long strips of black or green fabric on the canvas to imitate columns of light. If you like, spread it evenly across the rectangle and add some fun and whimsical loops. Don’t worry if it breaks. Connect them to create a continuous line, as they will smooth out as you roll them.
Transfer the light shapes onto the fabric and place the oval/petal shapes along the dark colored strands. He can perform one color at a time or alternate colors. Take a very small piece of black or green fabric and place it at the end of the light adjacent to the cord to mimic the socket that connects the light bulb to the strand.
For simple geometric patterns: Transfer the shape to an empty canvas and spread it evenly across the rectangle. You can use the same colors all at once or alternate them.
Roll, cut, and bake cookies. Cover the finished design with another piece of clean parchment. Using a rolling pin, roll out the dough evenly in all directions until it is 1/4 to 3/8 inch thick and just enough to reach the edge of the parchment. Slide the entire slab, still on the cookie sheet, onto a large sheet pan and refrigerate for 5 minutes.
Line two large sheet pans with parchment paper. Transfer the sheet of dough on the parchment to the counter and trim the edges as needed to form a neat rectangle (reroll the edges for a bonus multicolored bonus cookie). Cut cookies using a 2- to 4-inch cookie cutter (your favorite shape) and place them on the prepared sheet pan, about 1 inch apart. Or use a sharp knife to cut into squares. Transfer the pots to the refrigerator for at least 5 minutes (do one at a time if you are short on space). This will help the cookies maintain their shape while baking.
Remove from the refrigerator and bake, one cookie at a time, for 8 to 12 minutes, or until cookies are puffed. Then it starts to deflate and the bottom starts to turn golden brown.
Let cool on the pan for 5 minutes, then transfer to a wire rack to cool completely.
Take the remaining dough scraps, roll them together, cut and bake. The result is fun, colorful cookies and nothing goes to waste.
Save and print the recipe. pattern sugar cookies